Soil testing tips
Find out what your soil and plants need!
Deb Archdeacon is an agronomist who has worked across a range of agricultural industries throughout the South West since 2004. Deb is passionate about helping farmers improve the long term condition and productivity of their soil. South West Catchments Council spoke with Deb to get some tips about soil testing.
Why should farmers soil test?
Testing the properties of your soil gives you information on the availability of plant nutrients, and whether the chemistry and organic matter levels are suitable for soil biology and good soil structure. By comparing your test results to recommendations or benchmarks, you can manage inputs and amendments to achieve good growth without overusing fertilisers and without potentially reducing profits. Tests are not infallible but they will provide you with a good guide to achieving healthy soils and plants.
How can farmers get the most out of soil testing?
Finding out the chemical and physical requirements that maximise your crop productivity before you soil test is the best way to plan which parameters to measure.
I think it’s also really important to know your soil texture. This will indicate how well your soil will hold onto any inputs that are later applied. It also helps you set realistic targets if you are trying to build soil carbon, because the ability to store carbon is influenced by clay content. Standard tests come back with an estimate of soil texture, but asking for a particle size analysis will give you more reliable results. It’s not an expensive test and you only need to do it once.
Can you test for soil biology?
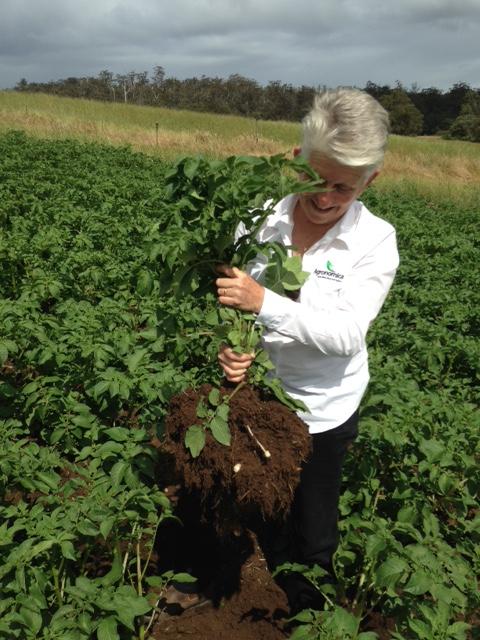
My aim is to promote a diverse soil biology with a diverse system, but I infer progress rather than test for biological deficiencies. For example, if the soil supports pathogens and disease it’s safe to say that the biology isn’t diverse. Alternatively, the biology is probably starting to crank up if less fertiliser is required, if the soil sticks to plant roots (see image below), or if weeds such as cape weed become less dominant. Improving parameters such as soil organic carbon and pH will often help the biology sort itself out.
Monitoring change in soil carbon
If you want to accurately monitor change in soil carbon, you need to set up a few monitoring points: 5x5m areas that you return to over the years. But make sure you pick a representative area and sample to depth. Note that this won’t give you a good estimate of average soil carbon but is useful for determining long-term trends. Refer to the GRDC soils page for further detail.
What other tests are useful?
Other important tests to conduct are water quality (for irrigators) and plant tissue tests. Knowing the quality of irrigation water goes hand-in-hand with soil testing. Plant tissue/sap tests are also a valuable crop monitoring strategy to identify issues with the crop itself [Note: Sampling and analysing petioles can be used to accurately diagnose micronutrient status].
How do you choose a laboratory?
One important consideration is finding out if the testing methods offered by the lab match the data available for your crop. For example, if the local crop data measured “Colwell” phosphorus (most WA data is Colwell P), ask for a Colwell P test with the PBI (phosphorus buffering index—a measure of how hard the soil hangs on to the phosphorus) to make easy comparisons. It’s almost impossible to compare different phosphorus tests.
You should use an Australian Soil and Plant Analysis Council (ASPAC) accredited laboratory. Most laboratories don’t give advice on inputs for crops, and those that do can have very different points of view. It’s important to stay with a lab once you’re happy with it and not switch around because of the different testing methodologies. You need to compare apples with apples.
How do you collect representative soil samples?
Soil properties can be quite different in valley flats compared to hillslopes. Properties can even change between the upper and lower parts of the hillslope. Its important to separate samples between these different soils, and having a dig around can help you identify differences so you can roughly map them out. A dig stick (pictured below) can be a useful tool because part of the shaft is missing, allowing you to see the changes in the soil with depth. Digging can also uncover physical and chemical constraints such as soil compaction, sodicity or acidity.
Once you have a good feel for the changes in soil across your property, decide on the depth to which you want to sample. This will depend on the crop you are growing and whether you have found evidence of constraints at depth. Then take one composite sample (made up of 15-25 subsample cores) for each depth within each of the mapped areas. It’s important that you sample in spots that are representative of the mapped area and not in animal camps, small depressions or other anomalies.
As you continue to soil sample over the years, use the same sampling points to increase your ability to detect change. You should also sample at the same time of year, generally before the growing season so any fertiliser applications don’t skew the results, and avoid sampling wet soils.
Follow the link for further information on soil sampling and testing.
This project is supported by the South West Catchments Council, through funding from the Australian Government’s National Landcare Programme.

