Why it is important to prevent or treat gullies
Gullies present multiple challenges, as they:
- Can be a hazard for livestock, wildlife, vehicles and people.
- Collect and divert water to dehydrate landscapes and reduce the water available for production and ecosystem services.
- Move topsoil, silt and nutrients downstream, away from the natural landscape, and may cause environmental pollution.
- Can keep growing, deeper and upslope.
How do gullies develop?
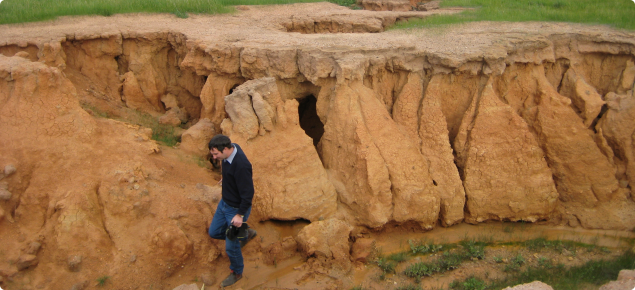
Gullies develop when enough surface water concentrates in a flow line with inadequate groundcover, resulting in scouring of soil until a deeper channel is formed. The starting point for gully development could be disturbed soil, a livestock or vehicle track, or exisiting erosion. Once started, gullies can spread downslope and upslope (gully head erosion).
Severe gully erosion is worsened by extreme rainfall from storms and cyclones. With the projected changing climate, summer storms in the south-west are forecast to be more common and more severe. The timing of these storms, when most pastures and crop stubbles are dry and groundcover is reduced, increases the risk of water erosion.
In extreme rainfall events, not all gully erosion can be prevented. We provide the information below to help those who have new or older active gullies.
A gully is any eroded channel deeper than 30 cm, and some gullies can be many metres deep.
Where to start
Begin by planning and setting priorities for action:
- The highest priority is to prevent active gullies that threaten more land.
- Invest in areas and options that give the best return for the cost.
- Always include management of surface water upslope of the gully.
Should you fill or stabilise?
Filling and shaping large gullies can be expensive. Stabilising may be appropriate where cost is prohibitive or where the gully is not actively eroding.
Stabilising gullies
Stabilising can be done in steps:
- Divert surface water from the gully using well-engineered surface water earthworks.
- Stabilise the eroding gully head.
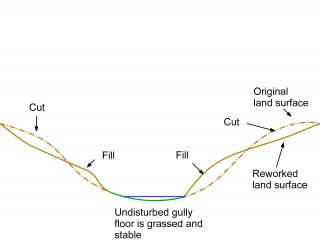
- Shape the gully walls.
- Fence the gully to exclude stock.
- Encourage grass and other groundcover vegetation growth to stabilise the gully floor.
Filling or shaping large gullies assumes that the gully, when stable, can be used as part of a surface water management system on the farm.
Divert surface water from the gully
Diverting surface water away from the gully is the first step to repair gully erosion. Reduce or prevent water movement in the gully until the repair is stable, otherwise it will erode any repair work. We recommend diverting water well upslope of the gully using surface water management options, and include spreader banks immediately above the gully head to divert water to a section of stable waterway with a safe receival area. If this safe area is not available, create a stable re-entry location. Spreader banks may also be needed on either side of long gullies to prevent surface water entering the repaired area.
Options include:
- spreader banks
- grade banks
- grassed waterways
- shallow relief drains.
Stabilise the eroding gully head
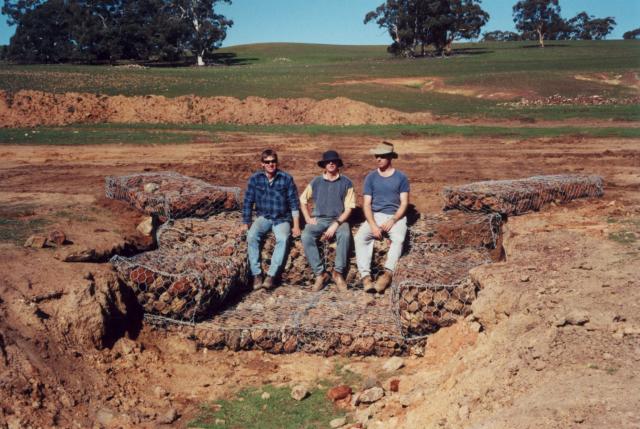
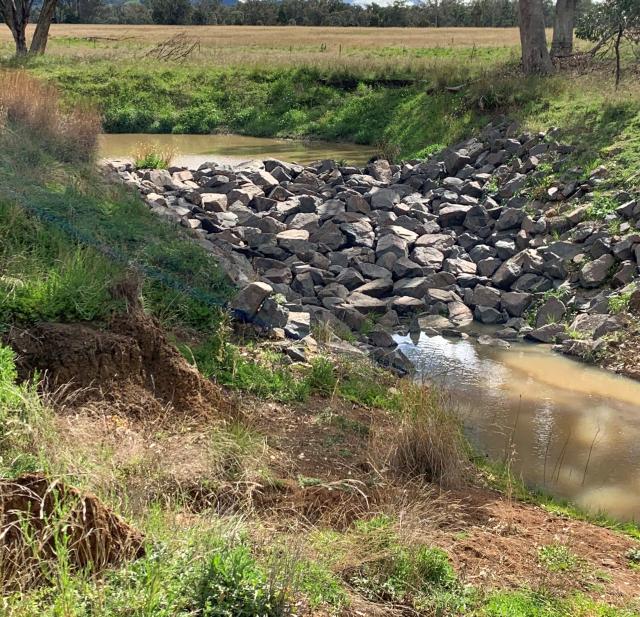
Many gullies erode fastest at the head (start) of the gully. This is where most of the water enters the gully and falls to the gully floor. An actively eroding gully head will need works to prevent it from eroding. Use a drop structure, typically built from concrete or gabions (rock-filled cages – Figure 1), or a flume which may be formed from concrete, rocks, or grass.
Gullies which have larger catchment areas receive more runoff and deeper flows. A rock flume can provide long lasting protection and stabilise an eroding gully head and upstream gully walls. Figures 2 to 6 are of a rock flume.
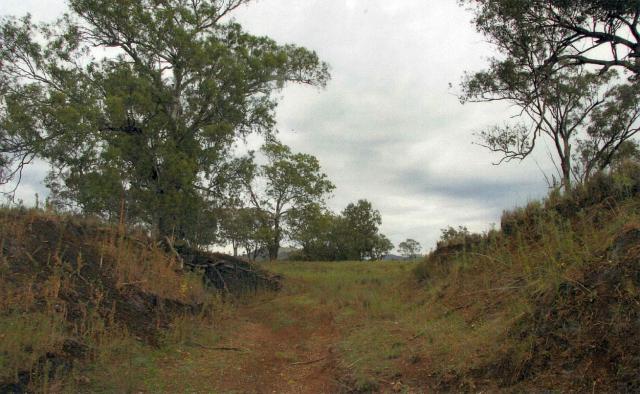
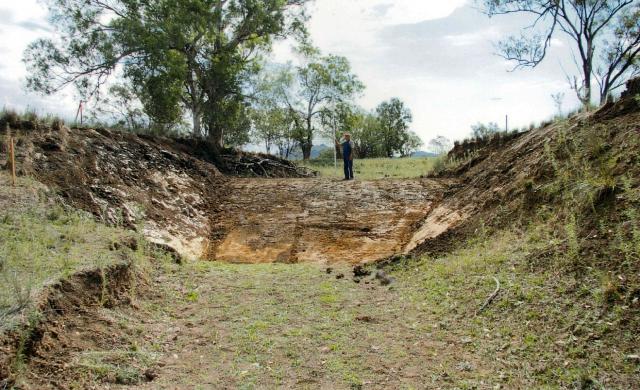
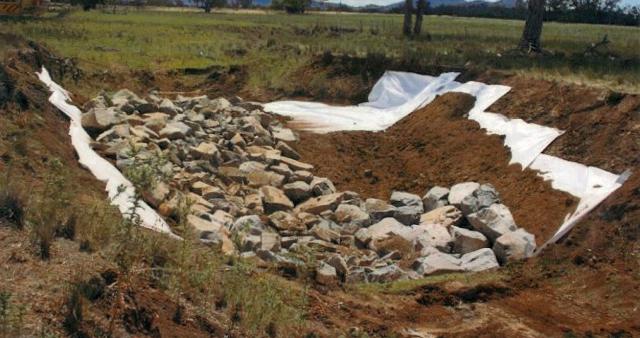
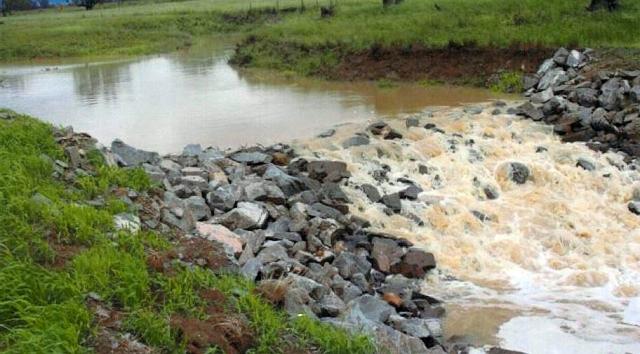
Careful planning, costing, design, construction and maintenance will increase the success of gully erosion control. We recommend you draw on professional advice to plan your works.
Important points for controlling gully head erosion:
- Management and maintenance of the site: all works require good vegetation management of the site and gully to ensure long term stability. If this is not possible, walk away.
- Rock type: rock that is too small, rounded, fragile or that does not have an appropriate distribution of sizes can be ineffective or washed away.
- Use of geotextile: geotextile is easily torn and punctured when working with large angular rock. Use an adequate layer of protective material (local sediment or gravel) over the geotextile to protect it from damage.
- Design of the crest and gradient of the ramp: as the gradient of the flume ramp (rock face) increases, so does the power of the water to move rocks. The energy dissipater on which the flow falls before exiting the structure needs to be built of sufficiently large rock, depth and width to ensure that downstream scouring of the bed does not cause undermining of the structure. The end of the energy dissipater should always be set at or slightly below the downstream gully floor. The width of the structure should be sufficiently wider than the existing gully that the gully does not outflank the structure on either side. To do this the structure needs to be keyed (built) into each bank.
- Location for the works: siting works on the actual gully head may not be the best approach. Choose a site with appropriate stability, avoid locations that are too narrow (and likely to experience a greater depth of flow and erosive forces. Also avoid a gully on a bend (and more prone to erosion of the outside bank).
- Construction resources: make sure you have all the needed resources before starting – do not 'cut corners'.
Shape the gully walls
Note that gullies in dispersive soils need special management:
- Do not leave rip lines or loose soil if the soil is dispersive.
- Use gypsum treatment on suitable clays.
- Add deeper topsoil to the exposed dispersive subsoil if possible.
- Seed with a suitable annual to get rapid groundcover as early in the season as possible.
where there is a stable gully floor, batter back the side walls to reduce side-wall erosion (Figure 7). This design only suits stable gully floors where there is no active erosion. The best practice guidelines for a grassed waterway may be appropriate.
Filling gullies for crop or pasture
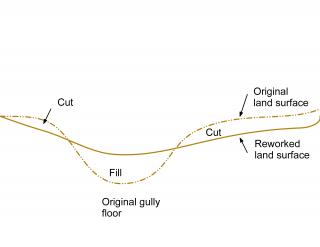
If you intend to crop across the top of a filled gully, use shallow approach angles for machine traffic (Figure 8).
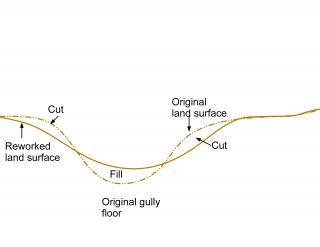
Where the area is to remain as permanent pasture, you can use steeper batters (Figure 9). The length and slope of the batters will determine the amount of soil disturbed on the shoulder of the gully. There is no need for a drop structure if surface water is to remain permanently diverted from the site.
Your topsoil is important
You can improve vegetation establishment and stability of the gully site by stockpiling the topsoil to spread it back over the reshaped gully. This is particularly important when the subsoil is infertile or dispersive. In these cases, failure to redistribute the topsoil over the site will make it very difficult to stabilise the gully, and it is likely to continue eroding. If dispersive (sodic) clay is exposed in the gully floor, we recommend applying gypsum before spreading topsoil.
For long gullies, use a grader to strip and stockpile topsoil in windrows parallel to the gully. The gully is then filled from a 'borrow zone' and progressively compacted by the grader. When filled, the grader spreads topsoil over the stripped borrow areas and the filled gully walls and base.
For long stretches of gully to be filled, split the gully repair into sections, spreading the topsoil from new sections onto areas previously filled. This minimises the distance topsoil needs to be transported. Push extra topsoil to the head of the gully for later spreading over the gully centre.
Establish a good vegetation groundcover
Establish vegetation cover as soon as possible after earthworks are finished. Ideally, this means filling gullies in autumn or early winter before heavy rains. We recommend at least 1 year of heavily sown grassy annual pasture on newly repaired erosion scars. The denser cover and matting roots of annuals provide better protection than taller tillering grasses and crops, such as canola and lupins.
In pasture paddocks, it is worth fencing large repaired gullies and any grassed waterways below them to protect the groundcover. The area can be grazed as necessary after groundcover is established.
In cropping paddocks, we recommend that you do not crop across filled gullies until the whole gully is well stabilised, and only use zero tillage.
Remove obstacles in the gully
Do not plant or allow trees and shrubs to grow in the repaired gully because these act as obstacles that can increase erosion by scouring in heavy flows. Dumped machinery, loose rocks and general rubbish in the gully may also cause more scouring.
Machinery management for repairing large gullies
Important warning
- Many gullies have lateral tunnel erosion, or 'piping'. Unstable gully edges could collapse and make machinery operations hazardous.
- Gully walls may have steep gradients that are a hazard to machinery operation. Take all normal precautions on such sites.
Graders are efficient at moving large volumes of soil laterally when repairing long gullies. Bulldozers are more suited to large and complex gully head erosion.
Graders or bulldozer operations should begin by deep-ripping the gully shoulders to a distance and depth depending on the depth of the gully and optimal batter length. Rip lines should not be present after removing the shoulders and filling, otherwise erosion risk is increased. Guidelines for open deep drains can be adapted for constructing shaped gullies.
The topsoil should then be stockpiled at the gully head. If machinery compacts the subsoil during the removal of the topsoil the area will need to be ripped a second time.
Once the topsoil has been stockpiled and the subsoil ripped:
- If the gully floor is already stable and can be used as a watercourse, do not add fill to the gully floor, and avoid machinery traffic on the floor.
- If the gully floor is eroding, the subsoil can be pushed into the gully. We recommend that fill is compacted by machinery regularly to help increase stability, and the amount of fill is increased (by 10 to 15%) in the gully to allow for settling.
For long gullies, the process above can be done in sections – from the head – and repeated along the length of the gully.
If the gully is small enough, spreading the topsoil over the entire length of the gully in one operation is more efficient (in terms of dozer operation), because the dozer is always moving with a load.


