How to set up aphid traps
Materials required (provided)
- Two-sided yellow sticky traps
- Trap labels (with site and trap info)
- Sandwich ties
- Electrical tape
- Drinking straws
- Box or ziplock bags for packaging sticky traps
Firstly, please collect the following site information
- Location/GPS
- Canola variety sown
- Sowing date
- Insecticide seed treatment: nil, Gaucho, Cruiser Opti or Poncho Plus
- Background weeds e.g. wild radish
- Stubble retained: No or Yes (low, medium, heavy)
Setting up the traps - every two to four weeks beginning around sowing time until stem elongation
- Select a fenceline facing prevailing wind direction and/or near a potential virus reservoir e.g. volunteer canola, wild radish.
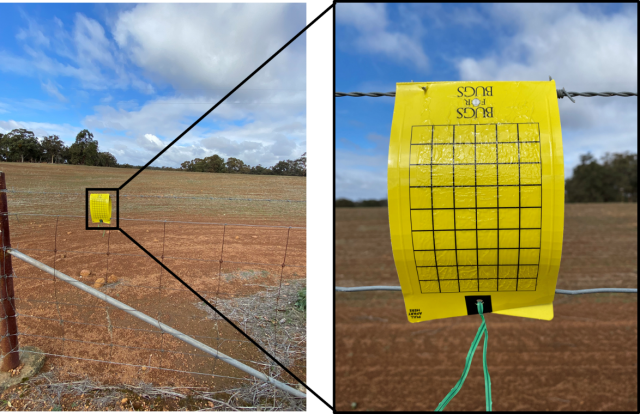
- Fix the sticky trap to top of the fenceline using sandwich ties (at least 1m above ground level) so that it cannot flap around in the wind, as shown below. Ensure the top edge of the punch hole is reinforced with electrical tape to avoid ripping in windy or wet weather. Set up two to three traps 50-100m apart at each site.
- Collect trap after 2 to 4 weeks and ensure trap details are filled out on the label e.g. date in, date out, crop growth stage and paddock I.D. Attach a fresh set of sticky traps to fenceline.
- When sending traps, it is important to minimise contact between the sticky glue and other surfaces when sending to avoid damaging aphids. Placing drinking straws on the sticky face can help maintain separation between traps when packing them.
- Record if and when (e.g. five leaf stage) the grower sprays Transform or any other insecticides applied to the crop.
Send traps to:
Ben Congdon,
3 Baron-Hay Court
Kensington WA 6151
Taking leaf samples
- Take the youngest leaf of 100 plants evenly across the sampling pattern. Begin sampling from the fenceline at the first trap to ~100 metres diagonally into the crop, then diagonally back to the fence line at the second trap, and so on in a ‘W’ pattern if three traps set up or a ‘V’ pattern for two traps (see above).
- Put leaf samples into plastic ziplock bag.
- Write paddock I.D. on bag using a marker pen.
- Send samples to:
Ben Congdon,
3 Baron-Hay Court
Kensington WA 6151
Acknowledgements
This work is supported by DPIRD Boosting Grains Science Partnerships project 2019SP02 in collaboration with Cesar Australia.


